As I posted last week, I love Helen Breil‘s shapes eBook, so this week I am trying another of her shapes. This one is Big Twist #5. I think it is one of my favorites.
I just love the movement of this necklace. I needed to make a necklace to go with a black and red outfit so I used Linda Moseley’s controlled marbling technique to get a skinner blend with mostly red. So here’s my process and the final result.
The first step I took was to take some scrap clay and make the shape to get some practice and to see the result of the shape.
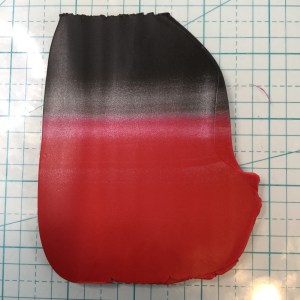
Then I used Linda Moseley’s controlled marbling technique to create a skinner blend with more red, less black and a bit of silver. I ended up using three silver parts instead of two. I’m glad I did as I like the end result.
Here is how I stacked the discs and my first blend.


I blended a bit further than Linda’s recommendation because I wanted more blur between colors. I made sure that the blend was the same on both sides, since both sides are visible with this shape.

I made the first cut. I did not use plastic to bevel the edges because I wanted sharp edges. Same with the second cut.


I finished shaping the cut and then made the fold. Helen includes very detailed pictures in her tutorials, so the result is perfect!
I would have liked a bit more black on the arms but that’s how we improve our art, correct? Next time I will use one more black disc and one less red. Maybe a bit more silver, but I’m pretty pleased with the outcome.
I cured it along with a couple of beads I made to add to the necklace.
 I found out that when you put buna cord in the oven, it shrinks and becomes wider. So one of the cords is wider, but it actually adds to the aesthetic of the piece. I also cut 1/4″ strips of the blend and shaped into matching earrings. I’m very pleased with the end result.
And with the outfit!

#2017PCChallenge 3/52
ECB Designs – www.elicbrowndesign.com